Custom CD Prints
A Musician’s Guide to Custom CD Prints
Check Our Prices Here
Turning your digital playlist into custom CD prints is more than just burning tracks—it’s about
creating a piece of tangible art. For indie artists, it’s a must-have for the merch table. For the rest of us,
it’s a truly memorable gift. The whole process comes down to designing your artwork, picking the right
packaging, and finding a printing service that gets your vision. This guide breaks it all down for you.
Why Custom CDs Still Matter for Your Music
In a world running on streams and downloads, pressing a physical CD can feel like a step backward.
But honestly? The value of a well-made CD goes way beyond the music on it.
For any independent musician or creator, it’s a powerful way to connect with fans and, frankly, to make
some money. Think of it as a playable business card, a piece of merch, and a keepsake all rolled into one.

Unlike a track that gets lost in a massive digital library, a physical CD offers a real experience.
Your fans can hold the artwork, flip through the liner notes, and feel a much deeper connection to
your creative world. It’s a physical presence that a digital file just can’t touch.
Building a Deeper Fan Connection
Having a stack of custom CDs at your merch table does more than just bring in cash; it builds your
community. When a fan buys your CD after a killer show, they’re taking a piece of that night home
with them. That’s a personal moment you just don’t get from a click on a streaming app.
The benefits are pretty clear:
- Boosts Your Perceived Value: A professionally printed CD sends a message: you’re serious
- about your craft. It screams quality and dedication, making fans more willing to invest in your music,
- both emotionally and financially.
- Better Profit Margins: Let’s be real—the markup on physical media blows streaming royalties out of
- the water. Selling a CD for $15 that cost you $5 to make is direct, substantial profit.
- Total Creative Freedom: You’re in the driver’s seat. From the cover art to the booklet design and the
- type of case you use, every single element is yours to shape, reflecting your unique identity as an artist.
For so many artists, the CD isn’t just a format; it’s a canvas. It’s your chance to present a complete artistic
statement, mixing your sound with visual storytelling to pull the listener even deeper into your world.
At the end of the day, making custom CDs is a smart, strategic move. It gives your most dedicated supporters a
premium product, opens up a valuable revenue stream, and helps you build a more loyal and engaged fanbase.
Getting Your Artwork and Audio Ready for Production
This is where the magic happens—turning your digital files into a physical product you can hold. Honestly,
getting your artwork and audio files prepped the right way is the most critical step in making sure your
custom CD prints look and sound exactly like you imagined. I’ve seen small mistakes at this stage lead to
big disappointments down the line.
This isn’t just about dragging and dropping files. It’s about setting up your project to meet professional
printing standards. For your visuals, that means knowing the technical specs that prevent common headaches
like blurry images or colors that just look off compared to your design.
Nailing Your Visual Artwork
Your album cover is the first impression. Getting the print quality right isn’t just important; it’s everything.
Professional printers work with very specific standards to get those sharp, vibrant results we all want.
Trying to wing it is a surefire way to get a pixelated or washed-out CD.
Here are the non-negotiables for your art files:
- Resolution: Your images need to be at least 300 DPI (dots per inch). Anything less will come out l
- ooking fuzzy when printed. Trust me on this.
- Color Mode: Set everything to CMYK (Cyan, Magenta, Yellow, Key/Black). RGB is for screens,
- CMYK is for ink on paper. Submitting in RGB will cause a color shift.
- Bleed Area: Always extend your design about 1/8th of an inch past the final trim line. This “bleed”
- is a safety net that ensures you don’t end up with weird white edges after the paper is cut.
The most common mistake I’ve seen is artists placing lyrics or logos way too close to the edge. You have
to keep all the important stuff inside a “safe zone,” well within the trim lines, or you risk it getting
chopped off during production.
Failing to meet these specs is the number one reason for production delays. A quick double-check before you
upload will save you a ton of time, money, and stress. If you want to see how the different printed parts fit
together, take a look at these examples of custom CD covers and inserts.
Mastering Your Audio for CD Replication
Just like your artwork, your audio needs to be in a specific format for professional CD manufacturing.
You can’t just zip up a folder of MP3s and expect top-tier sound. The industry standard is precise for a
good reason—it guarantees quality.
For the best possible sound, you need to deliver your audio in one of two ways:
- Sequenced WAV Files: This is the straightforward option. You provide individual, high-resolution
- WAV files (16-bit, 44.1 kHz) for each track, numbered correctly so we know the sequence.
- We then assemble the master.
- DDP Image: This is the pro choice. A Disc Description Protocol (DDP) image is the master
- file format for CD replication. It’s a complete, error-checked folder containing all your audio,
- track spacing, and metadata, all bundled together.
Hands down, a DDP image is the most reliable way to go. It takes all the guesswork out of the equation
for the plant and ensures the final CD is a perfect clone of the master you signed off on. If you’re working
with a mastering engineer, make sure to ask for a DDP file as your final delivery. It’s the best way to
guarantee your music sounds just as crisp and clean on every CD player as it did in the studio.
Choosing the Right Packaging for Your Project
Your custom CD print packaging is way more than just a box. Think of it as the first handshake—it’s the
first physical thing a fan touches and sees. The choice you make here really sets the tone for the entire
experience, affecting everything from how cool it looks to how well it holds up, and even what it costs you to ship.
Getting this right is key to creating a product that feels legit and truly reflects your music.
Each packaging style has its own vibe. Some are tough and classic, like the old-school albums we grew up with.
Others are sleek, modern, and better for the planet. Your choice should feel right for your brand and, of
course, your wallet.
Comparing Popular CD Packaging Options
Let’s get into the nitty-gritty of the three most common options you’ll come across. Each one is a trade-off
between durability, cost, and eco-friendliness. You need to think about how your fans will get their hands
on it. Is it getting tossed around in a merch box at a punk show, or is it a special limited-edition release for
your top supporters?
The chart below gives you a quick visual breakdown of how the Jewel Case, Digipak, and Cardboard Sleeve
stack up against each other.
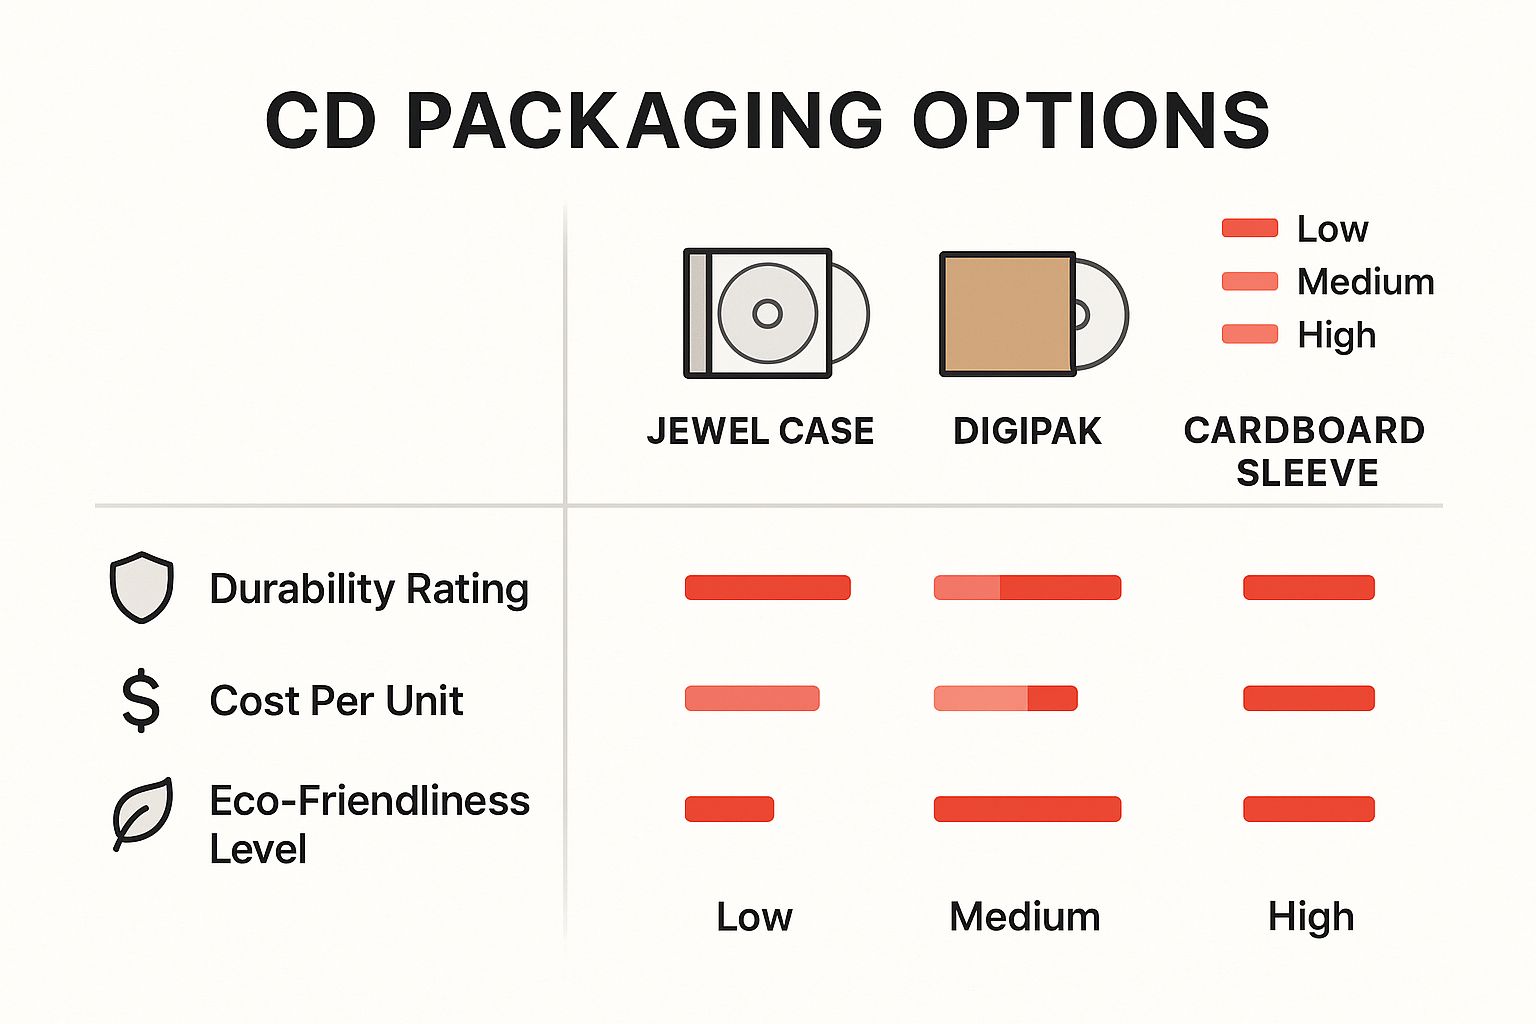
As you can see, the classic Jewel Case is the tank of the group, offering great protection but not winning any
awards for being green. On the flip side, Cardboard Sleeves are easy on the budget and the environment
but don’t offer much protection. Digipaks? They often hit that sweet spot right in the middle.
The Digipak has really become the go-to for indie artists. It gives you that premium feel with a printed
gatefold but weighs less than a jewel case. That makes it look great and cost less to ship out to your fans.
To help you weigh your options, here’s a more detailed comparison of the most common packaging formats.
CD Packaging Options at a Glance
| Packaging Type | Key Features | Best For | Average Cost |
|---|---|---|---|
| Jewel Case | Hard plastic, clear tray, room for booklet & tray card. | Retail releases, albums needing maximum protection. | $$ |
| Digipak | Cardboard gatefold with a plastic tray, premium feel. | EPs, albums, special editions where visuals matter. | $$$ |
| Cardboard Sleeve | Lightweight, single pocket, eco-friendly. | Promos, singles, budget-friendly releases. | $ |
Each option brings something different to the table, so think about what matters most for your specific project—protection,
presentation, or price.
Beyond the Case: Finishing Touches Matter
Once you’ve picked your main packaging, don’t sleep on the smaller details. These finishing touches are what separate an
amateur product from a professional one. Two things you really need to think about are the print on the disc itself and
the paper finish for your inserts or booklet.
These choices completely change how the CD feels in someone’s hands.
- On-Disc Printing: You’ll usually have two choices: silkscreen or offset. Silkscreen is killer for bold, simple
- designs with just a few solid colors—it gives you really vibrant, solid coverage. If you’ve got a full-color photo or
- complex artwork, offset printing is the way to go for high detail and smooth gradients.
- Booklet & Insert Finishes: The paper finish changes the whole mood. A glossy finish makes colors pop with
- a slick, commercial shine, which is great for high-energy music. A matte finish, on the other hand, has a more
- muted, artistic vibe with zero glare, perfect for acoustic or more organic-sounding projects.
Nailing these details makes sure your physical CD feels cohesive and complete. To get a better feel for how all these
components look when ordered in bulk, check out these examples of custom CD print boxes and cases. At the end
of the day, the right mix of packaging and finishes will create something memorable that truly does justice to the music inside.
Placing Your Order and Nailing the Details
Alright, you’ve done the heavy lifting. Your audio is mastered, the artwork is dialed in, and you know exactly what kind
of packaging you want. Now it’s time to actually get your custom CD prints made. This final stretch is all about clear
communication and paying close attention to the details. Get this right, and you’ll avoid any nasty surprises when those
boxes show up.
Let’s imagine a real-world situation. You’re in an indie band getting ready to drop your new album. You decided on 500
Digipaks, and you absolutely need them in your hands before the big release party in three weeks. The pressure is on.
Submitting Your Assets Correctly
First thing’s first: you have to send your files over to the printing company. Most places have a simple online portal
where you can upload your DDP audio master and the CMYK artwork files. A classic mistake here is rushing this
step—uploading an old version of the artwork or completely forgetting a piece, like the design for the clear tray inside the case.
Before you click “upload,” double-check everything. I always recommend creating a folder on your desktop called
something like “FINAL_CD_ASSETS_FOR_PRINT” and putting only the finished files in there. It’s a simple habit
that can save you from a massive headache later.
Once you submit everything, the printer’s pre-press team will give your files a once-over to make sure they’re
technically sound. If they find a problem, like a low-resolution photo or missing bleed, they’ll reach out.
You need to jump on those emails fast to keep your project moving.
Understanding Turnaround Times
This is a big one. You have to get a handle on the production timeline. A standard turnaround for replicated CDs
is usually 10-15 business days. Here’s the kicker: that clock starts only after you’ve approved the final proof,
not the moment you upload your files. This little detail trips up so many artists.
For our indie band with a three-week deadline, that timeline is getting dangerously tight. It leaves zero room
for shipping delays or any back-and-forth to fix file issues.
Always, always build a buffer into your release schedule. If a printer tells you 10 days, plan for 15. Trying
to rush a manufacturing job is just asking for something to go wrong.
The All-Important Proofing Stage
Before a single CD gets printed, you’ll get a digital proof. This is basically a PDF mockup that shows you exactly
how your artwork will look once it’s printed and folded. Do not just glance at this and click approve.
This is your absolute last chance to catch an error before it’s multiplied by hundreds.
When you’re looking at the proof, be meticulous. Check for:
- Typos: Read every single word. Song titles, credits, thank yous, everything.
- Image Placement: Make sure no heads are getting cut off and that all your art is centered correctly.
- Color Accuracy: Just remember, the colors on your backlit screen (RGB) will likely look a little different
- from the printed CMYK version. This is normal, but check for any major shifts.
- File Integrity: Does anything look blurry or pixelated? Make sure all the elements are actually there.
If you spot a mistake, let your printing rep know exactly what needs to be changed. Once you give that final “okay,”
your project heads to the production floor, and making changes becomes either impossible or incredibly expensive.
A thorough proof review is your best insurance policy for getting custom CDs that look as professional as they sound.
If you want to see what the final product looks like all packed up, check out these examples of completed CD inserts and boxes.
The Real Value of Physical Media for Creators
In a world buzzing with instant streams, pressing custom CD prints might feel like a throwback. But for artists
who know their audience, physical media is a smart move, both financially and strategically. It’s about turning your
music into more than just files—it becomes a tangible piece of art for your most dedicated fans.

Think of a CD as a premium souvenir from a gig or a limited-edition collectible. When a fan buys your CD, they’re
not just getting songs; they’re taking home a physical piece of your journey. That handshake deepens the artist-fan
connection in a way a digital playlist just can’t touch.
Connecting Beyond the Stream
A physical product completely changes the listening experience. It invites fans to sit down and engage with your
album as a whole, from the first track to the last, soaking in the artwork and liner notes. In an age of skipping
tracks, that kind of focused listening is a rare thing.
Plus, let’s talk sound quality. CDs deliver a high-fidelity audio experience that many streaming platforms can’t
match due to compression. For the audiophiles and true fans in your base, that uncompressed, richer sound is a
huge draw—it’s the closest they can get to your original studio master.
A custom CD print isn’t just cool merch; it’s a direct revenue stream with seriously good margins. Selling a
CD for $15 that cost you $5 to make puts $10 straight into your pocket. You’d need thousands of streams
to see that kind of return.
This direct-to-fan model is a game-changer for independent artists. It gives you immediate cash flow to fund your
next recording session, tour, or project.
A Stable Niche in a Digital Market
Sure, CDs are a niche product now, but they hold a surprisingly steady spot in the market. They appeal to collectors,
die-hard fans, and anyone who still values the permanence of physical media. The desire for tangible goods is still
strong, especially for artists who focus on building a real community.
The numbers back this up. The global disc duplication market, which includes custom CD prints, is projected to
be worth around $500 million in 2025 and is expected to climb to $680 million by 2033. This shows a consistent
demand, especially from musicians who get the value of offering a premium, physical option. You can dig into more
details from the physical media market report from Data Insights Market.
At the end of the day, offering custom CDs isn’t about fighting against digital. It’s about adding another layer to your
strategy—a profitable, high-quality product that strengthens your brand and gives your biggest supporters
something real to hold onto.
Got Questions About Custom CDs? We’ve Got Answers.
Jumping into the world of custom CDs for the first time can feel like a lot. You’ve got your music ready,
but what about the nitty-gritty of getting it pressed? Don’t worry, we see these questions all the time.
Getting a handle on these details upfront saves a ton of headaches later. It helps you set a realistic budget,
nail down your release timeline, and make sure everything goes off without a hitch.
What’s the Smallest Order I Can Place?
This is probably the most common question we get, and the answer comes down to how the CDs are made.
The minimum order quantity (or MOQ) is tied directly to the production method.
- Duplication (for smaller batches): Think of this as burning CDs, but on a professional level. It’s fast,
- flexible, and perfect for short runs. You can typically order as few as 25-50 CDs. This is the go-to choice for
- indie artists making tour merch, bands selling demos, or anyone just testing the waters with physical media.
- Replication (for the big runs): This is the full-on industrial manufacturing process where a glass master
- is created to press your discs. Because of the intensive setup, the minimum order is much higher—usually
- starting at 300-500 units. If you’re planning a major release and need retail-ready quality, replication
- is the way to go, and it gets way cheaper per disc as you order more.
Basically, duplication is your best friend for speed and small quantities. Replication is for when you need that
top-tier, professional quality for a larger audience.
Duplication vs. Replication: What’s the Real Difference?
It’s a crucial distinction that impacts cost, turnaround time, and quality.
Duplication is a burning process. We take high-quality, blank CD-Rs and burn your audio data onto them with a laser.
It’s quick, efficient, and the best option for any order under 500 units when you need them fast.
Replication, on the other hand, is the gold standard for any commercial release. Your audio is used to create a glass
master, which is then used to physically stamp the data into molten polycarbonate to create the actual disc. It’s a much
more involved process, but it delivers unmatched quality and durability. This is how major label albums are made.
How Long Until I Have My CDs in Hand?
Timing is everything, especially when you have a release date circled on the calendar. A key thing to remember is that
the production clock starts after you’ve signed off on the final proof.
Duplication is the faster of the two, usually taking about 3-7 business days to complete.
Since replication involves creating a master and pressing the discs, it naturally takes longer—expect around 10-15
business days. And always, always add a buffer for shipping time, especially if you’re trying to hit a hard deadline
for a release show or tour kickoff.
One of the biggest mistakes we see is artists not factoring in proofing and shipping. If a manufacturer quotes you
10 business days for production, it’s smart to build a 15-day window into your schedule just to be safe.
Do I Need a License to Print My Own Music?
Yes, absolutely. You have to own the legal rights to reproduce every single track on your CD. If you wrote,
performed, and recorded all the music yourself, you’re good to go.
But if you’ve included any cover songs—music written by someone else—you are legally required to get a
mechanical license. This license makes sure the original songwriter is paid for their work. Any reputable C
D printer will ask you to confirm you’ve secured all the necessary rights before they even start the presses.
678-780-1722
cdinserts@gmail.com