Creating the Perfect Custom CD
Your Guide to Creating the Perfect CD Custom Order
CHECK PRICES HERE
Making a cd custom order is about more than just burning tracks onto a disc. It’s about crafting a tangible
piece of art that creates a real, lasting connection with your audience. You’re turning digital files into something
your fans can actually hold, collect, and treasure.
Why a Custom CD Still Matters for Your Music

In a world filled with fleeting digital playlists, pressing a physical CD makes a powerful statement. It
gives your fans something real in an increasingly intangible world.
For listeners, the experience starts the second they hold the artwork and flip through the liner notes. It’s an
engagement of sight, touch, and sound that streaming just can’t replicate. That physical connection elevates
your music from a simple audio file to a memorable artifact they’ll keep for years.
On top of that, the audio quality on a CD is still a massive selling point. Uncompressed WAV files deliver a
listening experience with a depth and clarity that heavily compressed streaming formats often lose. For any
true audiophile or dedicated fan, that superior sound is a huge draw.
A Tangible Asset for Your Brand
A custom CD is one of the best pieces of merch you can have, and it directly supports your career. When a fan
buys your CD at a show or from your online store, they aren’t just buying music; they are investing in you as
an artist. That builds a much stronger relationship than a passive stream ever could.
Think of it as the ultimate business card. It showcases your professionalism and signals a serious commitment
to your craft. A well-designed CD package acts as a physical representation of your entire artistic vision, reinforcing
your brand identity every time someone sees it on their shelf. A digital file just can’t do that.
A custom CD transforms your music into an experience. It’s a collectible item that tells a story through sound,
ight, and touch, creating a lasting bond between you and your listeners.
The Market is Stronger Than You Think
It might seem counterintuitive, but the demand for physical media is surprisingly resilient. The global Compact
Disc market was valued at around USD 1.5 billion in 2023 and is actually projected to grow.
This steady interest is fueled by collectors and music lovers who genuinely value the authenticity and superior
quality of physical formats. You can find more insights about the sustained CD market on Dataintelo.com.
What this proves is that a dedicated audience is out there actively looking for physical music. By offering a cd
custom product, you’re tapping into a passionate market segment that is more than willing to pay for a premium,
tangible product that deepens their connection to the music they love.
Getting Your Audio Ready for Pressing
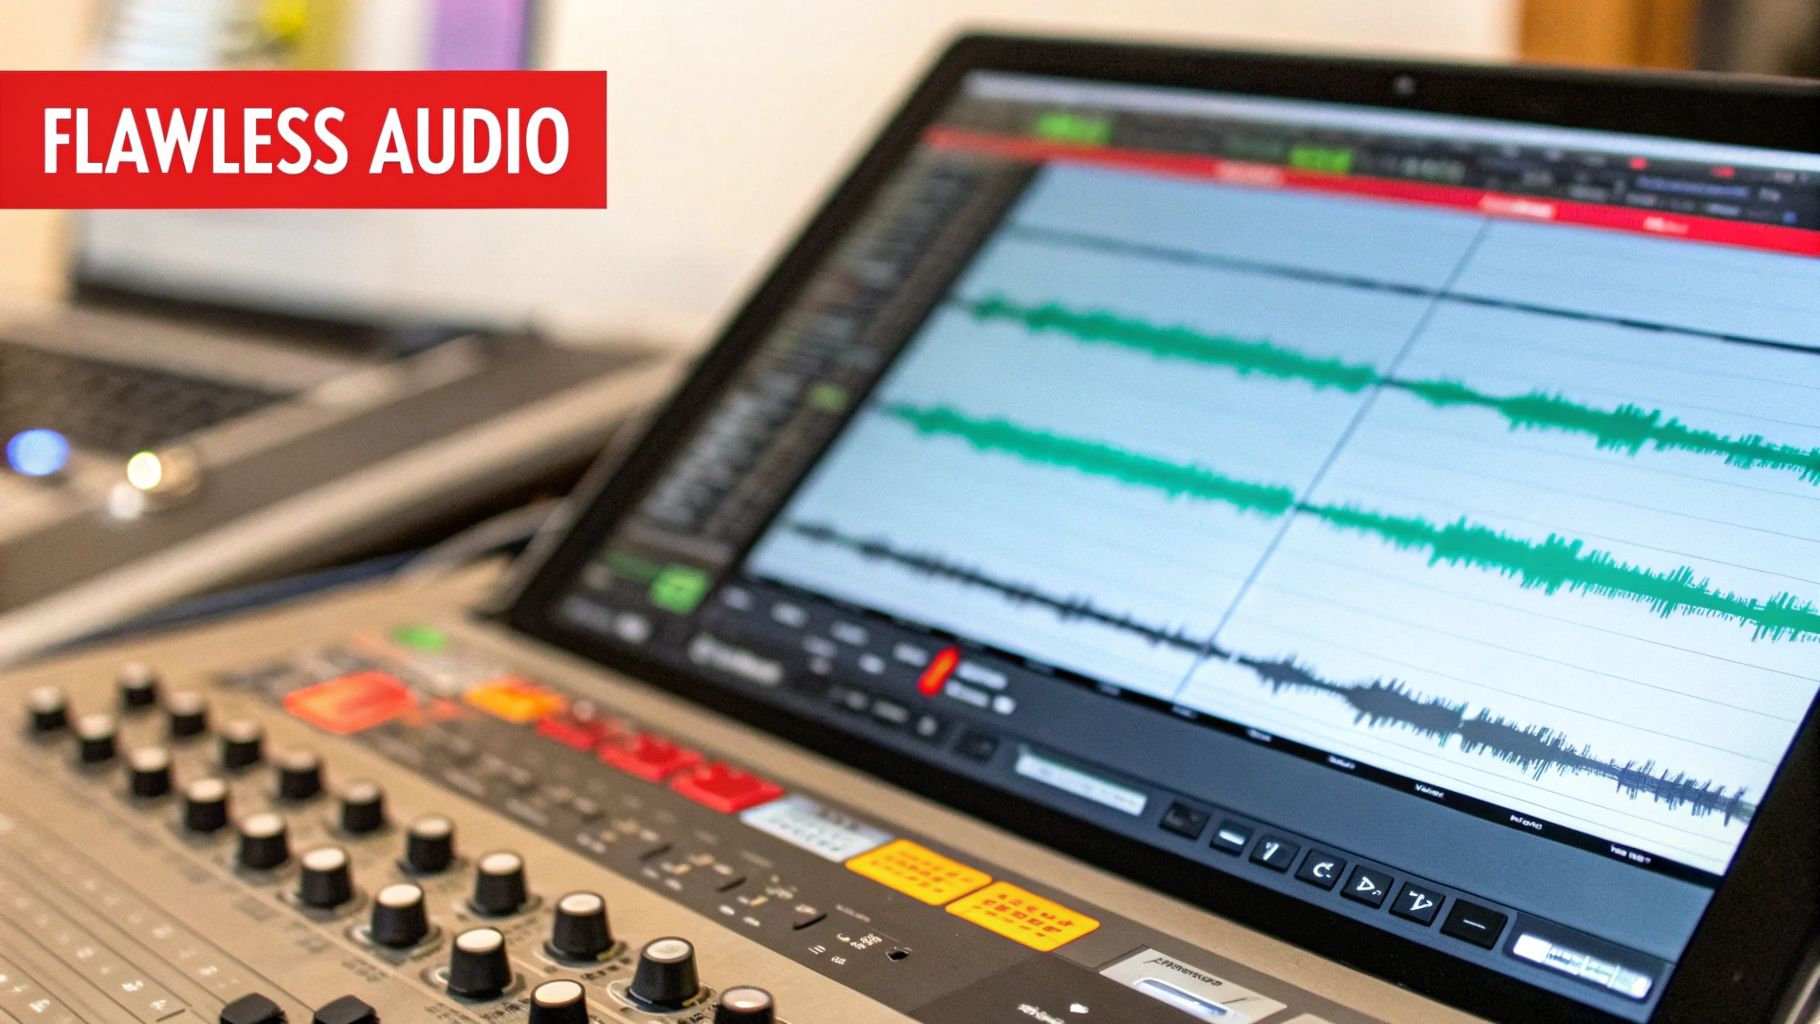
Before you even think about album art, let’s talk about what really matters: the sound. The foundation of any great
cd custom project is flawless, professionally prepped audio. Getting your sound files right is the single most
important step to make sure your final product is crisp, clear, and exactly how you heard it in your head.
It all starts with the right file format. We get a lot of questions about MP3s, and while they’re perfect for your phone,
they are what’s known as a “lossy” format. To save space, they compress the audio and permanently throw away data.
For professional pressing, you need an uncompressed, “lossless” format to keep every last detail.
This is why WAV files are the undisputed industry standard. They deliver the full-fidelity audio needed for
high-quality CD production. No compromises.
The Correct Audio Specifications
For your Mixtape Duplication order, your WAV files need to hit a very specific target: 16-bit, 44.1 kHz.
This isn’t just our rule; it’s the universal Red Book audio CD standard that every CD player in the world is built on.
Let’s quickly break that down:
- 44.1 kHz (Kilohertz): This is the sample rate—how many “snapshots” of the audio are taken per second.
- 44.1 kHz is the magic number because it perfectly captures the full range of human hearing.
- 16-bit: This is the bit depth, which controls the dynamic range (the difference between the quietest and
- loudest sounds). 16-bit gives you a fantastic, high-quality range that’s ideal for CD playback.
Sending in files in another format, like a 24-bit studio file or an MP3, means they have to be converted.
That conversion process can introduce tiny errors and water down the final sound. Start with the right specs,
and you’re already on your way to a great-sounding CD.
Sequencing and Mastering Your Tracks
Once your files are in the right format, it’s time to think about the flow. How you sequence your tracks creates
the album’s entire emotional arc. Think about the listener’s journey from the first note of track one to the
final fade-out.
Make our lives (and yours!) easier by numbering your files clearly to match the final track order. Something
simple like 01_Track_One.wav, 02_Track_Two.wav does the trick. This tiny bit of organization prevents
any mix-ups during production and guarantees your album plays exactly as you envisioned.
Finally, we need to talk about mastering. This is the final, crucial quality-control step that transforms your
individual mixes into a cohesive, polished album. A pro mastering engineer will balance levels between songs,
tweak the EQ for consistency, and optimize the whole thing for CD playback.
Mastering isn’t a suggestion; it’s the critical final polish that elevates your project from a “collection of songs”
to a commercial-ready album. Skipping this is the fastest way to get an unbalanced, amateur-sounding CD.
Think about it: a great master ensures one song isn’t jarringly loud after a quiet one, or that the bass doesn’t turn to
mud on certain car stereos. It’s the secret sauce that gives your cd custom project that professional sheen,
allowing it to stand up proudly next to any major label release. Seriously, investing in mastering is investing in
your music.
Designing Artwork That Sells Your Sound
Once your audio is locked in and sounding perfect, it’s time to create a visual experience that captures your sound.
Think about it: your CD’s artwork is the very first thing a fan connects with. It’s the visual ambassador for your music,
the thing that draws someone to your merch table and convinces them to take your album home.
The packaging you choose for your cd custom project is a huge part of that first impression. Each option
has a completely different feel and purpose.
Choosing Your Custom CD Packaging
So, which package is the right fit for your music? A punk band might lean into the raw, simple vibe of a printed
sleeve, while a cinematic folk artist could use the expansive canvas of a digipak to showcase epic photography.
The packaging is a direct extension of your music.
To help you decide, here’s a quick breakdown of the most common options:
| Packaging Type | Best For | Pros | Cons |
|---|---|---|---|
| Jewel Case | Full-length albums, projects with extensive liner notes, and a classic, professional look. | Durable, offers space for multi-page booklets, industry standard. | Can feel a bit dated, plastic is prone to cracking. |
| Digipak | EPs and albums wanting a premium, modern feel. Great for artistic, seamless designs. | Eco-friendly cardstock, lightweight, high-end feel, large canvas for art. | Less durable than jewel cases, corners can get worn. |
| Sleeve/Jacket | Singles, EPs, demos, and promotional giveaways. | Minimalist, cost-effective, lightweight, and easy to distribute. | Limited space for artwork, offers minimal protection for the disc. |
The right choice really depends on your budget, your brand’s aesthetic, and how you plan to get your CDs into the hands of
listeners. For some great inspiration, check out these different CD cover and box image examples to see how different layouts work.
Mastering the Technical Print Specs
Before your designer even opens up Photoshop, you need to understand the three non-negotiable rules of print design.
Getting these right from the jump will save you from costly reprints and frustrating delays. It’s the only way to guarantee
what you see on your screen is what you’ll get in your hands.
This infographic breaks down the essentials perfectly.
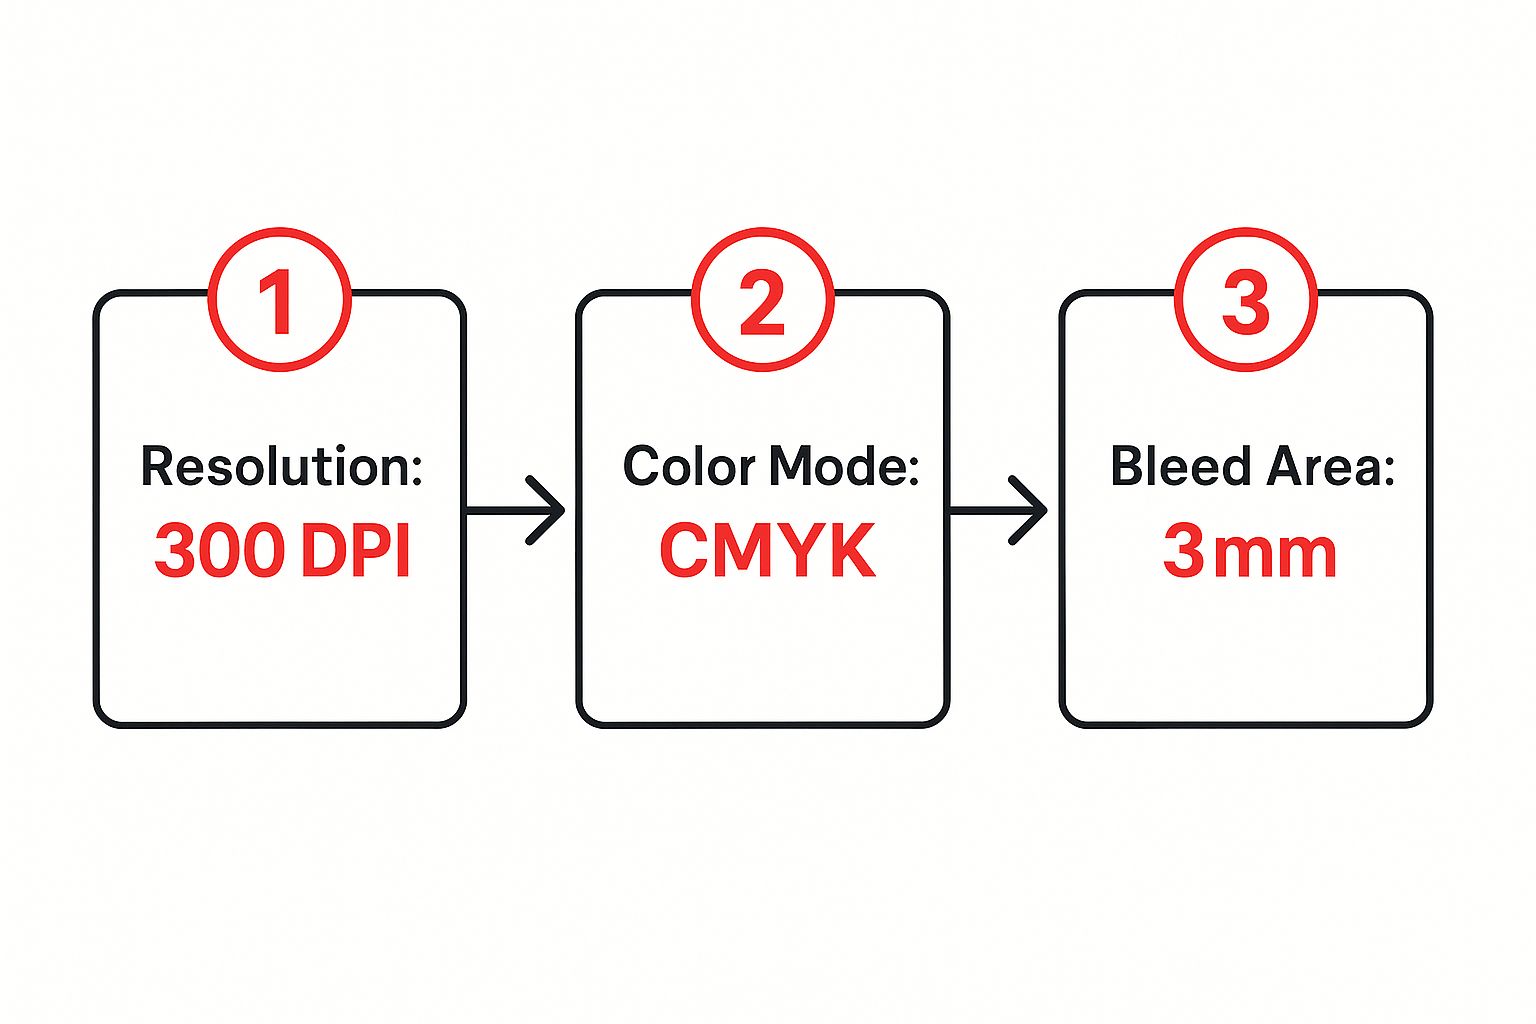
Seriously, follow these steps. Let’s break down exactly why each one is so crucial.
- Resolution (300 DPI): DPI means “dots per inch.” Your computer screen looks fine at 72 DPI, but for
- professional printing, you need much higher density. Anything less than 300 DPI will come out looking
- blurry, pixelated, and just plain amateur.
- Color Mode (CMYK): Screens use an RGB (Red, Green, Blue) color model, creating colors with light.
- Professional printers, on the other hand, use a CMYK (Cyan, Magenta, Yellow, Black) model with ink.
- If you design in RGB, the colors will shift during printing, often looking dull or just… weird. Start in CMYK.
- Bleed Area (3mm): When artwork is printed on large sheets and then cut down to size, there’s always a
- tiny margin of error. A 3mm bleed is extra artwork that extends beyond the final trim line. This ensures
- your design goes right to the edge without any ugly white slivers.
Your album art isn’t just packaging; it’s the visual handshake with your listener. Nail the technical details so
your first impression is as professional as your sound.
Despite what you might hear, the demand for physical media is still strong. The disc manufacturing market is
projected to be a $2.5 billion industry in 2025. This shows a real, dedicated audience that expects
high-quality products.
Following these print standards ensures your cd custom project meets those expectations and stands
out for all the right reasons.
How to Place Your Order Without the Headaches

Alright, this is where all your hard work starts to pay off. The Mixtape Duplication ordering portal is built to be
a straight shot, taking you from product selection to checkout without any confusing detours.
You’ll kick things off by picking the type of cd custom project you’re bringing to life, whether it’s a full album
or a stack of promotional singles for your next gig. As you can see from the homepage, the layout is clean and
simple—that’s by design. We want you to find your packaging and get started, not get lost clicking through
endless menus.
Navigating Your Packaging and Quantity Options
Once you’ve locked in your packaging choice—maybe it’s a classic jewel case, a sleek digipak, or a simple sleeve—
it’s time to talk numbers. How many do you really need?
Think about your goals. Are you pressing 100 units to sell on your next tour, or is a smaller, limited run of 25 a
better fit for a special release? This choice directly sets your cost per unit. While bigger orders drop the price per CD,
it’s always smarter to sell out and reorder than to end up with boxes of unsold merch in your closet. To get a feel for
what different quantities look like, check out how different quantity orders are boxed and shipped.
Next up are the finishing touches. These might seem like minor details, but they’re what separate an amateur release
from a professional one.
- Shrink-wrapping: This gives your CDs that crisp, retail-ready seal. It protects them from scratches and
- tells fans they’re getting a brand-new, untouched product.
- Thermal Printing: This is a clean, cost-effective way to print a one-color text design right onto the disc.
- Perfect for your artist name, album title, and tracklist.
- Barcodes: Planning to sell your CDs in stores? A barcode is non-negotiable. It’s essential for inventory
- management and point-of-sale systems.
The online portal is your production dashboard. Every selection you make, from the type of paper for your
insert to whether you add shrink-wrap, directly shapes the final product your fans will hold.
Uploading Your Final Files
After you’ve customized every detail of your order, it’s time to hand over your files. The system will ask for two
things: a ZIP file with your sequenced WAV audio tracks and another ZIP file with your print-ready artwork
templates.
This is a critical step, so pause and double-check everything. Make sure you’re uploading the absolute final versions.
Submitting the wrong files is one of the most common—and totally avoidable—reasons for production delays.
Once you’ve uploaded everything, the portal will confirm it’s received. From there, you just need to head to
checkout, give your order one last look, and send it off for production.
The demand for creating custom products like these is booming. The global custom manufacturing market was
valued at an incredible $858.8 billion in 2021, showing just how much people want unique, personalized goods
. You can dive into more details about this growing market on Allied Market Research. It’s a powerful reminder
that fans and consumers value one-of-a-kind products—exactly like the custom CD you’re about to make.
Your Final Checklist Before You Submit
You’ve spent weeks, maybe even months, mastering your audio and perfecting your artwork. You’re so close.
Before you hit that final “submit” button, take just five extra minutes for one last look. This is your personal
quality control pass, and trust me, it can be the difference between a perfect cd custom order and a frustrating,
costly delay.
Think of it like proofreading an important email before you send it. After staring at the same files for so long,
simple mistakes are easy to miss. A fresh set of eyes—even your own after a short break—can catch a glaring
error that was hiding in plain sight.
https://www.youtube.com/embed/qb4KnWfNX4I
Review Your Audio Files One Last Time
Let’s start with the most important part: the music. Put on a good pair of headphones and listen through your
final audio files from beginning to end. Don’t just skim them; pay close attention to the sequence.
- Is the track order correct? You’d be surprised how often
01_Track_One.wavisn’t actually the song - meant to open the album. A simple file naming mistake can completely throw off the listening experience
- you worked so hard to create.
- Are there any audio glitches? Listen for any unexpected clicks, pops, or digital noise that might have
- slipped in during the final export.
- Is every file the correct format? Double-check that every single track is a 16-bit, 44.1 kHz WAV file.
- If one rogue MP3 or a 24-bit file sneaks into the folder, it can cause problems during production.
This final listen-through isn’t about second-guessing the mix—that part is done. It’s about technical
verification, making sure the files you’re uploading are exactly as you intend them to be heard.
Scrutinize Your Artwork and Text
Next up, the visuals. Open your final print files and zoom way in. Here’s a great trick I’ve learned: read
every single word of text out loud. It forces you to slow down and helps you catch typos that your brain
might otherwise skip over.
Be on the lookout for common but easily missed errors. Did you remember to embed all your fonts? If not,
your carefully chosen typography could be replaced by a generic default. Are all your images high-resolution?
A pixelated logo can make an otherwise professional design look cheap.
Finally, triple-check your contact info, website URL, and social media handles. A single typo in your website
address can send potential fans to a dead end—a completely avoidable mistake.
Getting every detail right ensures that the final product, like these expertly packaged custom CDs with inserts,
looks and functions perfectly. This last check guarantees the cd custom package that arrives at your door
is something you can be truly proud of.
Common Questions About Making a Custom CD
Diving into your first cd custom project? It’s normal to have a few questions swirling around. Let’s tackle
some of the most common ones we hear from artists getting their first run of discs together.
One of the first things people ask is about turnaround time. Every project has its own timeline, of course, but a
standard CD duplication order here at Mixtape Duplication usually takes about 7-10 business days once
we’ve got your final artwork and audio files approved. If you’re going for a larger order (think 500+), you’ll be
looking at replication, which takes a bit longer because the manufacturing process is more involved.
Then there’s the big one: licensing. What if you want to include a cover song on your album? You absolutely,
positively need to secure the rights first. It’s a legal requirement to get a mechanical license before you can
manufacture and distribute your version of someone else’s song. Don’t worry, it’s not as scary as it sounds—
services like Easy Song Licensing can handle the heavy lifting for you.
What Is the Minimum Order Quantity?
This question comes up a lot, especially for indie artists who are smart about their budgets. The good news is you
don’t have to commit to a garage full of 1,000 discs right out of the gate. Modern CD duplication is incredibly flexible.
The minimum order quantity (MOQ) is actually really accessible for most projects.
- CD Duplication: You can get started with as few as 25 or 50 units. This is perfect for a limited-edition drop,
- selling merch at a handful of shows, or just dipping your toes in the water.
- CD Replication: This process involves creating a glass master, so the starting point is higher—usually around
- 500 units. It’s the go-to for bigger releases where the per-unit cost really starts to drop.
Starting small lets you avoid tying up a bunch of cash in inventory. You can always sell out and order more.
Don’t overcommit on your first run. It’s far better to sell out of 50 CDs and create genuine demand than to
be stuck with 400 unsold copies.
Can I Get a Physical Proof?
Nothing beats the peace of mind that comes from holding a sample in your hands before the full run. While a full,
pressed CD proof isn’t typical for smaller duplication orders (the process is just too fast), you will always get
digital proofs of your artwork.
That digital proof is your final chance to triple-check every single detail—the layout, the text, the colors—
before anything goes to print. For larger replication orders, physical proofs are sometimes an option f
or an extra fee. If you’re making a big investment, it’s definitely something worth asking about to make sure
the final product is exactly what you envisioned.
678-780-1722
cdinserts@gmail.com